"For I know that I am fearfully and wonderfully made in You...You make it Beautiful Somehow"
Showing posts with label DIY. Show all posts

Tuesday, November 6, 2012

Pom Poms, Pillows, and Passing Things Down

I have been having so much fun putting together all of the small touches in Charlotte's nursery. My newest crush: Pom poms!  After using them on my Lamp redo I have been thinking of all other places I can add them!

So, pom pom trim for a pillow? Absolutely!!!


This pillow was extremely easy to make and only took about 15 minutes to finish. I have been holding on to this vintage floral mint green fabric for forever, just waiting for the perfect time to use it. It goes perfectly in Charlotte's nursery! I bought the pink pom pom trim at Hancocks on sale, and stuffed it with left over stuffing from other projects. This pillow cost me only $1.50 to make!

For a good tutorial on making your own pillow covers check out...
The Sweet Survival: Sew a Pillow with Piping
E Tells Tales: Big Bow Pillow Tutorial
Teal and Lime: Envelope Pillow Tutorial


I just love those little pom poms! Luke loves them too and calls them balls...he has tried his hardest to remove them already. Ha!

For right now this pillow's home is on this adorable little wooden chair, next to Charlotte's toy cradle and baby dolls. I love being able to pass things that were mine, onto my baby girl. The doll, teddy bear, and cradle were all mine as a little girl. I am still debating on wether or not I want to sand down and repaint the cradle and the chair...not too sure yet.


I actually have at least one, maybe two or three more projects where I can see myself adding more pom pom trim. :-) I'm telling you....totally in love with the pom poms!


Linking to: Not Just a Housewife

Friday, November 2, 2012

Ombre Dresser

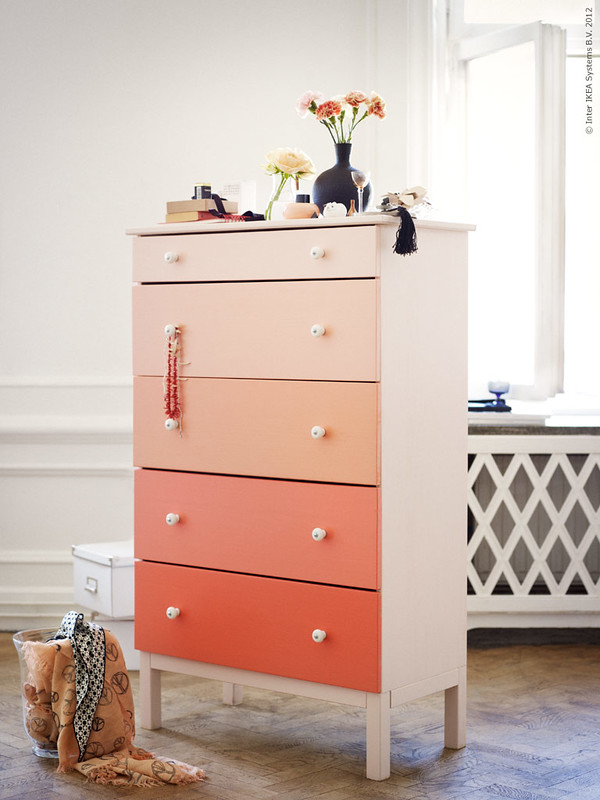
Here is another project that I have had finished for Charlotte's room for a little while now: Ombre Dresser. After seeing this post from Decor 8 with the Ombre DIY Dresser, I knew I wanted to copy it for Charlotte's room!

I had been looking for a small dresser for Charlotte's room for just a little while, and was so excited when I found the perfect little wood dresser at the thrift store for only $20!


I was going to do exactly like Decor 8 suggests by getting paint samples and painting each drawer a color from a swatch I liked. Their dresser is in Apricot shades and I decided to go with more of a pink/coral color. Well I found the perfect coral swatch at walmart but found out they don't sell paint samples. And any one who knows me well, knows that when I start a project I want to finish it quickly. I hate wait. So I decided instead of trying to find a Lowes or something around us I would just grab some Apple Barrell paint that matched the darkest color perfectly, and add white to lighten to the other shades. I didn't end up with the *perfect* shades but I got really close. Plus the paint only cost me $2 total. Awesome!

So here is my final result...

 (Please attempt to ignore our floor...it currently has concrete and some temporary carpet)

I am so pleased with how it turned out! I think the colors fade perfectly into each other, yet each one stands out. I am contemplating replacing the knobs with some glass looking ones, but am not completely sure yet.


Once the drawers had dried I lined them with some contact paper, moved the dresser into Charlotte's room, and promptly added a few cute and cuddly baby girl clothes...


Gah! Aren't those baby socks too cute!!!! I can't wait to fill the rest of the dresser with girly goodness!


Linking to: Not Just a Housewife

Thursday, October 25, 2012

Pom Poms, Mint, and Brave Books

One of my favorite little additions to Charlotte's nursery is her mint green lamp. This was a lamp I had for quite a while but did not really have a home for it. It was creme and had a plain white shade. Not too exciting. So for the nursery I decided to spray paint the base and embellish the shade.

The color I choose for the base (looks darker in the picture than it is in real life) was Krylon Catalina Mist in Satin. Then, I found this adorable mini pom pom trim at the store and knew it would be the perfect addition to the lamp shade. I simply hot glued the trim to the edges of the shade. Easy peasy!


Oh and that little stack of books on the dresser? I have slowly been collecting books for Charlotte. Some of these were my favorites as a little girl. Now I know that Charlotte won't be reading Pride and Prejudice any time soon...but it is never too early to start a book collection. Right?

I love this list of Brave Books for Girls. There are still several on the list that I am looking for at thrift stores to add to Charlotte's collection.


Linking to: Not Just a Housewife

Tuesday, October 23, 2012

Forever Felt Ball Flowers

I have been keeping busy lately making a few odds and ends items for Charlotte's nursery. Here is just one of the little projects that I have finished.

Felt Ball Flowers


I have seen the felt ball flower idea in a few different nurseries on Pinterest and loved the idea! I find them very simple, sweet, and kind of whimsical. You can buy felt ball flowers already made on Etsy, but I am more of a diy girl, so I made a quick run to Hobby Lobby. I found a package of premade felt balls for just a few dollars on clearance and picked up the green pipe cleaners to be the stems. I used a needle to put a small hole in one end of the felt ball, squirted in a dab of hot glue and stuck the pipe cleaner to it. Tada! All done.

Now, if you want to really diy, you can make the felt balls yourself! Jump on over to Lil Blue Boo for her tutorial on how to make your own felt balls. It is surprisingly easy! Plus you can make them in any color or size you want.

These flowers would be a beautiful addition to really any room in your home. Mix and match colors like I did or go with a single color. You can use pipe cleaners or even colored wire. Make small or large balls. Get creative and add some beautiful color to you home!


oh and...we are now 27 Weeks! Ah! 3rd Trimester!

Tuesday, October 9, 2012

Ruffled Crib Skirt


I posted a little while ago about my long to-do list for baby girl before she arrives in January. I decided to get started this week with her bed skirt. Thankfully this project did not take as much time as I first thought it would.

So here you have it... a girly, ruffly, vintage inspired crib skirt!


I have been searching Pinterest for different ideas and inspiration. Here are a few things that inspired me to make this crib skirt...

I loved the ruffles on this ombre crib skirt! You can actually find a full tutorial on how to make your own on EmmmyLizzzy!


Here is another layered crib skirt from On To Baby. I love how they use so many different prints that aren't really "matchy" but they "go" great together!


I also looooove the look of this layered crib skirt! Head over to Makely Home to find her tutorial on how to make one out of curtians and save money on buying lots of fabric!


To make Charlotte's crib skirt, I started with an already made, thrifted, crib skit. The skirt was the yellow gingham fabric edged with the lace that you see on the bottom layer. The crib skirt was really wide so I simply adjusted the dimensions and added the top layers to part of the base of the crib skirt. I already had the lace on hand, sitting in my fabric stash begging to be used, and I found the other two prints of fabric at Hancock's for 50% off. Score! In total this crib skirt cost me less than $10! I am so beyond in love with it! I can't wait to finish the rest of her bedding and see it all come together!

Wednesday, June 27, 2012

Laundry Soap Revisited: An Awesome Shortcut!

The first trimester of pregnancy is hard. This particular pregnancy has been kicking my butt. I'm not sure that it has just been a more difficult first trimester, or that having two little ones to chase around and care for has made it more exhausting. Thankfully I am not one of those who is violently ill, however, instead I feel miserably sick all day long. From the time I get up, to the time I go to bed. That alone is exhausting. I have not even been able to blog lately. Just looking at a computer screen makes me nauseous. Weird huh?!

But, I know all of this is so completely worth it! I feel blessed to be able to carry this little one. So, I count it all as blessings and take the sickness as a good sign that baby is healthy and growing.

In order to *attempt* to keep my house in order, clothes clean, and food on the table, I have been looking for short cuts to anything and everything! Here are my two absolute favorite shortcuts that I have found thus far for making some of my routine cleaning products! I will share one today and save the other for another post later.

Laundry Soap: No cooking required!


I shared in a earlier post about my homemade laundry soap (here). It really is fantastic! I was so in love with it that I had no interest with making anything else. Enter the first trimester, and the fact that heat/ cooking over the stove makes nausea so much worse. I found that I simply could not make my laundry soap. What little energy I could muster was going into playing with my boys, keeping the house tidy, ect. So I began looking for options. I went back to the original blog where I first found the recipe I use and saw that she had made a powder version of her laundry soap. I was skeptical at first. Would it really work as well? But I was down to my last load of laundry soap and needed more. So I went for it, and I couldn't be happier!!!!!

Here is what you need...


2 cups Borax
2 cups Super washing soda 
2 bars Fels Naptha
2 Quart sized canning jars


Shred your two bars of Fels Naptha. Place the shredded soap into your blender or food processor until it becomes a fine powder. It should be the same consistency as the Borax and washing soda. If you skip this step it will be too think and have a hard time fully dissolving in your washer. Next I added the Borax and Super Washing Soda to the Soap in the blender so it would mix it completely together.


This is what you want it to look like...


 Pour mixture into your quart sized jars and you are done! That simple.


To use: 


You only need 2 TEASPOONS, yes you read that right, for a LARGE load! I was so skeptical that this would actually work. But it does! It really does. Both my mother and my aunt have tried this powder recipe and are very happy with the results. 


Notes: This will make (2) 3/4 full jars...it does not fill all the way to the top. I have not done the math yet as to how long this lasts, but it is lasting me a long time so far! I have not had any problems with any residue and the detergent dissolves great. 

Have you tried a powder version of homemade laundry soap?


Tuesday, June 5, 2012

Citrus and Coconut Sugar Scrub

Just before mother's day I began searching for some homemade beauty products that I could make that would pamper my mother and mother-in-law. I found several wonderful and easy recipes, and today I am going to share my favorite. While perusing Pinterest I found a DIY Citrus Salt Scrub from adelynSTONE. Her recipe is very simple, few ingredients, and quick to make. Love it. I already had everything on hand except for the sea salt. So I made one adjustment and changed it from a Salt Scrub to a Sugar Scrub.

Ingredients: 

1 Cup Sugar
1/4 Cup Coconut Oil (melted)
1/2 tsp lemon juice or zest. (I did a little of both.)
Mixing bowl & Spoon
Small Jar with a lid

How to make your own Sugar Scrub:

Pour sugar into a mixing bowl. Add coconut oil a little at a time, mixing thoroughly with the sugar as you go. Once mixed completely and evenly add the lemon juice/zest to the sugar mixture and stir. Place into jar (I doubled this recipe and put it in a pint jar), seal with lid and add ribbon for gift giving...or keep for yourself and enjoy!


How to use your Sugar Scrub:

After washing your body in the shower apply scrub where desired. I love to use this on my elbows, knees, and especially my heels and feet. Scrub in a circular motion. Rinse clean. You could also simply fill up a small tub of warm/hot water and ask your sweet hubby to give you relaxing foot massage with your sugar scrub! Rinse clean and pat dry with a towel when done. Follow up with your favorite moisturizing lotion.

Benefits of a Sugar Scrub:

-exfoliate and remove dead skin
-softens dry skin
-super moisturizing
-gives you a healthy youthful glow

Variations: 

Make this scrub to your liking.
Use Sea Salt for a more coarse scrub
Use olive oil, vegetable oil, or almond oil
Add in some orange zest along with the lemon
Add in some coconut shavings

This scrub works wonderfully! It is very exfoliating and leaves my skin feeling so soft and smooth. I love it! Then add in the fact that I know all of the ingredients that are in it and it is cheap to make...this really is a win, win, win!!!


Linked to Living Green

Thursday, April 26, 2012

DIY "I SPY" Book

I SPY books are Jack's absolute favorite! He loooooves to look at them over, and over, and over, and over again. I have seen people making their own I SPY books lately, and decided to give it it a try.

I grabbed a bunch of different toys, a white sheet of paper, and my camera phone. Jack was super excited and helped me through the whole process. It was a ton of fun coming up with new ideas!

We set up our pages two different ways. Either we threw the objects randomly onto the white paper, or we set them up to create little "scenes".

Here are the pages we came up with..

Felt Shapes


Can you find a...Carrot, Tomato, Blue Fish, Three Yellow Stars, and the letters X, E, and D?


Baby Toys


Can you find a...Blue Polka Dot Elephant, puppy dog, horse, two butterflies, a bumble bee, the letter M, and a yellow bee on a ring


Batman's Cave


Can you find...Batman, Superman, The Hulk, Mr. Freeze, Dr. Doom, or The Joker


City of Blocks


Can you find...A Mouse, a Duck, a Lion, the letter Z, R, and o


Cars


Can you find...a Yellow Truck, Red Van, Yellow Taxi Cab, Blue Race Car, Blue Dune Buggy, and a Red 


Superheros


Where is Spiderman and the Hulk?


Toy Story


Can you find...3 Aliens, Mr. Prickle Pants, Jessie, and Woody


 Wooden Toys


Can you find...a Saw, a Pair of Pliers, Two Yellow Blocks, a Police Car, and a Red and Blue Bead


Wrestlemania


Can you find...The Undertaker, Rey Mysterio, Randy Orton, and Johnny Morrison?

(Yes...I know all their names...it is very sad! My husband is to blame.)


Barnyard Animals


Can you find...the Donkey, the little hen, the red rooster, the piglet, the owl, the dog, and the horse?


I even made a cover for it...


The possibilities are really endless. I still want to do...
kitchen theme
nature theme
craft supplies theme
movie case theme
color themed pages
bug theme
underwater theme
dinosaur theme

...the list could go on and on! 

My plan is to print them off to a 5x8 size, laminate them, single hole punch them at the top, and add a clip. This will be the perfect size to throw in my purse and take with us to the doctor, or anywhere! For more of a "board book" feel, you could modge podge the pictures onto cardboard, then punch holes in them and clip them together. 

So grab your little one, a camera, a sheet of white paper or a scenery prop, and take some pictures! You and your kiddo will have so much fun doing it, and end up with a one of kind book! 


Wednesday, April 25, 2012

DIY No Sew Apron


Today I am going to share a super quick, easy peasy, and cheap tutorial for an everyday apron! Since I have started line drying our laundry, I have wanted an apron with a pocket to put the clothespins in. So the other night I grabbed up some scrap fabrics, and whipped one up in about 30 minutes.

Don't know how to sew? Don't have a sewing machine? Don't sweat it! I share both a sewing and a        No-Sew version! 

Step 1.) Gather your Materials...I used some left over fabric for the main fabric, a handkerchief for the pocket, and some old lace for the ties. For the ties you can use lace, bias tape, ribbon, etc. Don't have a handkerchief...use any piece of fabric you want. I went with this hankie because the edges were already finished. Use whatever you have on hand. No need to buy new fabric!

If you are making the No Sew version you will want to pick up a small roll of Heat-N-Bond Ultra. You can find it at Wal-Mart or any craft store for just a few dollars. 


Step 2.) Cut your main fabric to the size above (28" wide x16" long). You can honestly make this any size you want...want it longer, add a few inches...want it wider...no problem! Do what ever size works best for you. 

Serge or zig zag edges so they do not fray.

**If you are making the No Sew version: When "hemming" the edges with Heat-N-Bond you will want to hem the top edge 1" and the sides and bottom 1/2". This will save you a whole step later on.**


Step 3.) Pin and sew handkerchief onto main fabric.

No Sew Version: Use Heat-n-Bond to adhere the two edges of the handkerchief together since you are folding it in half, before adhering it to the main fabric.


Step 4.) Sew or Bond  1 1/2" of the top of the handkerchief to the main fabric. This will give the pocket a bit more stability.


Step 5.) Hem the top of the apron. Fold over 1", iron and sew in place.

**If using the No Sew method this step has already been completed back in step #1. Yea!


Step 6.) Line up the center of your lace to the center of your apron. Attach with either Heat-n-Bond or pin in place.

No Sew: Once you attach the lace with Heat-n-Bond you are done! Try it on and be proud!

Sewing: Continue to step 7...


Step 7.) Sew lace in place.


All done! See...simple...easy peasy...and cheap! Now fill it with some clothespins, or whatever else you want and look super cute while working!


Linking to Frugal Days Sustainable Ways and Raising Homemakers

Related Posts Plugin for WordPress, Blogger...