"For I know that I am fearfully and wonderfully made in You...You make it Beautiful Somehow"
Showing posts with label Nursery. Show all posts

Tuesday, January 22, 2013

Charlotte's Sweet Vintage Handmade Nursery Reveal!

So I'm still here. Still pregnant.

I always thought 'oh going past your "due date" is no big deal, if I go over it won't bother me'.

Yah, what in the world did I even know?!

Apparently nothing.

Because, even if you can keep your self patient and positive it wears on you. Every day you do the same things to get everything prepared just in case today is the day. And then sink into bed at night disappointed that you didn't feel a single contraction, a single cramp, a single moment of maybe something is starting.

So, instead of making myself crazy trying to 'stay prepared' I have decided to just forget the fact that I am pregnant and it is time for this baby to get here. I have finally been able to write off the last few things on my to-do list and baby girl's nursery is finally complete! (the only exception being that she needs a crib mattress still!)

Here it finally is...the big nursery reveal! I am so in love with how it turned out. There are so many special little details that I have a hard time picking my favorite part of the room. So here we go...

Charlotte's Sweet Vintage Handmade Nursery


The curtains were the final project that took me forever to get to. But I am beyond in love with how they turned out. They are actually a mix of two different sets of curtains that I cut up and pieced together. The beautiful lace part of the curtain came from my moms house. I cut them apart and pieced in some sheer panels that I already had on hand to lengthen them and add interest. I just love looking at them! 


Her crib minus the mattress. Still need to buy that...hopefully in the next few weeks. You can see more details about the ruffled crib skirt here.

Then I made several decorative pillows for her bed. The patchwork in the back was made from my baby quilt. The embroidery pillow in the front was made from two place mats that I found at a thrift store. I love the flowers on it!

I made the sweet little rag doll using this pattern. I plan to make her a few more in the future. Maybe for next Christmas.

The quilt/crib blanket was made from a vintage thrifted sheet, the backing from my baby quilt, and some satin binding. It is so incredibly soft.


I have been in love with the pom pom mobiles and decorations I have seen on Etsy and Pinterest lately and knew that I HAD to make one for Charlotte's nursery. It was actually a really fun and easy project to make. You can find a how to here.


Next up is the "gallery" wall. It is definitely one of my favorite parts of the room. When I started thinking about what I wanted to do with the nursery I asked my mom and each of my sisters to paint a special picture that I could hang in Charlotte's room. I love the fact that she now has something special from her Hunny and each of her aunts! We found a lot of the pictures we used off of Pinterest and etsy and changed colors to match her rooms theme. 

The bunting was made from extra fabric scraps I had laying around. I love those kinds of projects!


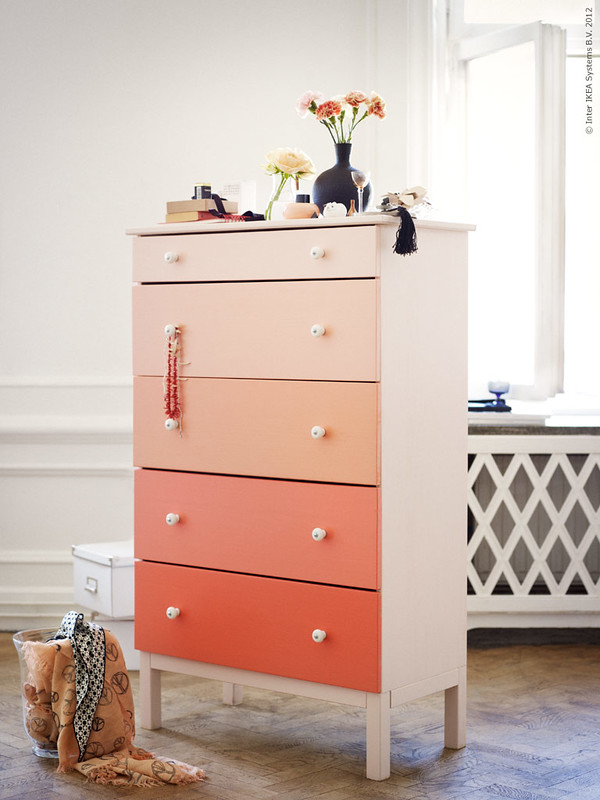
 I have shared previously about the Ombre dresser that I painted for Charlotte. I am still in love with it. I would love to add some glass knobs eventually though.


With the boys I bought wooden letter and spelled out their names above their cribs. But I decided to go with a giant C for little miss this time instead. To make the C I simply cut out a giant C from card board and wrapped it in yarn.

I had also been given a large amount of embroidery hoops and decided to make a small grouping for her wall. The white one says 'You are loved', the pink one has a creme dandelion on it, and the mint green one has a small heart in the corner.

On the dresser I have the mint green lamp, some brave girl books, and Charlotte's head band holder. The holder was made from gluing scrapbook paper to a oatmeal container and hot gluing a spray painted candle holder to the bottom. 


I love this little shelf. It holds a few storage containers, books, and that adorable little vintage playhouse. I am still looking for a little lamp to put on the table as well.

In the basket next to the shelf is all of the little toys I have been making and collecting. You can see them in more detail here


 On the last wall is Charlotte's Kite Hair Bow holder. You can find a tutorial on how to make your own here. If you can't tell I have been busy making bows!

I have added many items to her room that were my own as a little girl. The carousel horse, little white slip, dolls, and cradle were all mine.


So there you have it. Charlotte's vintage sweet handmade nursery. I love this room so much.

Now we are just waiting for the little girl to show up...anytime little girl...anytime...


.

Tuesday, November 6, 2012

Pom Poms, Pillows, and Passing Things Down

I have been having so much fun putting together all of the small touches in Charlotte's nursery. My newest crush: Pom poms!  After using them on my Lamp redo I have been thinking of all other places I can add them!

So, pom pom trim for a pillow? Absolutely!!!


This pillow was extremely easy to make and only took about 15 minutes to finish. I have been holding on to this vintage floral mint green fabric for forever, just waiting for the perfect time to use it. It goes perfectly in Charlotte's nursery! I bought the pink pom pom trim at Hancocks on sale, and stuffed it with left over stuffing from other projects. This pillow cost me only $1.50 to make!

For a good tutorial on making your own pillow covers check out...
The Sweet Survival: Sew a Pillow with Piping
E Tells Tales: Big Bow Pillow Tutorial
Teal and Lime: Envelope Pillow Tutorial


I just love those little pom poms! Luke loves them too and calls them balls...he has tried his hardest to remove them already. Ha!

For right now this pillow's home is on this adorable little wooden chair, next to Charlotte's toy cradle and baby dolls. I love being able to pass things that were mine, onto my baby girl. The doll, teddy bear, and cradle were all mine as a little girl. I am still debating on wether or not I want to sand down and repaint the cradle and the chair...not too sure yet.


I actually have at least one, maybe two or three more projects where I can see myself adding more pom pom trim. :-) I'm telling you....totally in love with the pom poms!


Linking to: Not Just a Housewife

Friday, November 2, 2012

Ombre Dresser

Here is another project that I have had finished for Charlotte's room for a little while now: Ombre Dresser. After seeing this post from Decor 8 with the Ombre DIY Dresser, I knew I wanted to copy it for Charlotte's room!

I had been looking for a small dresser for Charlotte's room for just a little while, and was so excited when I found the perfect little wood dresser at the thrift store for only $20!


I was going to do exactly like Decor 8 suggests by getting paint samples and painting each drawer a color from a swatch I liked. Their dresser is in Apricot shades and I decided to go with more of a pink/coral color. Well I found the perfect coral swatch at walmart but found out they don't sell paint samples. And any one who knows me well, knows that when I start a project I want to finish it quickly. I hate wait. So I decided instead of trying to find a Lowes or something around us I would just grab some Apple Barrell paint that matched the darkest color perfectly, and add white to lighten to the other shades. I didn't end up with the *perfect* shades but I got really close. Plus the paint only cost me $2 total. Awesome!

So here is my final result...

 (Please attempt to ignore our floor...it currently has concrete and some temporary carpet)

I am so pleased with how it turned out! I think the colors fade perfectly into each other, yet each one stands out. I am contemplating replacing the knobs with some glass looking ones, but am not completely sure yet.


Once the drawers had dried I lined them with some contact paper, moved the dresser into Charlotte's room, and promptly added a few cute and cuddly baby girl clothes...


Gah! Aren't those baby socks too cute!!!! I can't wait to fill the rest of the dresser with girly goodness!


Linking to: Not Just a Housewife

Thursday, October 25, 2012

Pom Poms, Mint, and Brave Books

One of my favorite little additions to Charlotte's nursery is her mint green lamp. This was a lamp I had for quite a while but did not really have a home for it. It was creme and had a plain white shade. Not too exciting. So for the nursery I decided to spray paint the base and embellish the shade.

The color I choose for the base (looks darker in the picture than it is in real life) was Krylon Catalina Mist in Satin. Then, I found this adorable mini pom pom trim at the store and knew it would be the perfect addition to the lamp shade. I simply hot glued the trim to the edges of the shade. Easy peasy!


Oh and that little stack of books on the dresser? I have slowly been collecting books for Charlotte. Some of these were my favorites as a little girl. Now I know that Charlotte won't be reading Pride and Prejudice any time soon...but it is never too early to start a book collection. Right?

I love this list of Brave Books for Girls. There are still several on the list that I am looking for at thrift stores to add to Charlotte's collection.


Linking to: Not Just a Housewife

Tuesday, October 23, 2012

Forever Felt Ball Flowers

I have been keeping busy lately making a few odds and ends items for Charlotte's nursery. Here is just one of the little projects that I have finished.

Felt Ball Flowers


I have seen the felt ball flower idea in a few different nurseries on Pinterest and loved the idea! I find them very simple, sweet, and kind of whimsical. You can buy felt ball flowers already made on Etsy, but I am more of a diy girl, so I made a quick run to Hobby Lobby. I found a package of premade felt balls for just a few dollars on clearance and picked up the green pipe cleaners to be the stems. I used a needle to put a small hole in one end of the felt ball, squirted in a dab of hot glue and stuck the pipe cleaner to it. Tada! All done.

Now, if you want to really diy, you can make the felt balls yourself! Jump on over to Lil Blue Boo for her tutorial on how to make your own felt balls. It is surprisingly easy! Plus you can make them in any color or size you want.

These flowers would be a beautiful addition to really any room in your home. Mix and match colors like I did or go with a single color. You can use pipe cleaners or even colored wire. Make small or large balls. Get creative and add some beautiful color to you home!


oh and...we are now 27 Weeks! Ah! 3rd Trimester!

Related Posts Plugin for WordPress, Blogger...