"For I know that I am fearfully and wonderfully made in You...You make it Beautiful Somehow"
Showing posts with label repurposing. Show all posts

Friday, May 14, 2010

T-Shirt Braclets

Since I had made Erica a present (Forever 21 Dress), and Emma a present (the bandanna tunic), I decided that I had better not leave my other two sisters out.

So I started looking around at some different blogs for ideas for the girls.

Now Erica and Miranda have been very into the whole rope/friendship/fabric bracelet thing. So after I saw this idea from Lil Blue Boo for recycled t-shirt bracelets I knew I had found the perfect present for Miranda.

She shows you how to make a braided version on her blog and then gives you a site (V&Co) where you can buy a tutorial on how to make the wrapped ones.

I decided that I liked the look of the wrapped ones the best but would just try to figure it out on my own.

and here is what I came up with...


I used four different colors of t-shirt scraps that I had on hand to make these.

It took a little bit of thinking as to how to make them keep their round shape and not just fall apart. So I played around with them for a while and finally got an idea.

I love bangle bracelets! As a result I have one entire drawer of my jewelery box that is devoted to them. Some are very nice, and others are just cheap thin bangles (and I have a ton of the cheap thin ones).

So I decided to take a few of the thin bangles I had to use as a base.

Next I cut two thin strips of t-shirt fabric...preferably two different colors.

Hold both strip of fabric in one hand, and with the other wrap them around the bangle. When you have wrapped the entire bangle simply tie them off....and viola! You are done!

Don't worry about making it perfectly spaced or anything...I think it looks better if it is not perfect. Do make sure that you wrap them tight though so they don't become loose. You may even consider putting a small dab of hot glue under the knot to make sure they don't come undone.


I wasn't surprised to find that Miranda LOVED them!


Wednesday, May 12, 2010

FOREVER 21

April 27th was my little sister's 21st birthday!


Isn't she beautiful?!?!


She put in a special request for me to make her something for a present instead of buying something. She mentioned that she loved my purple shrug and wanted something refashioned like it. So I dug through my closet and ended up with...

...this skirt and this dress...


I bought the dress from a thrift store (originally from Forever 21) for $2 about a month ago...I though it was adorable so I went ahead and bought it even though the top was a bit too small on me.

I bought the skirt from Target...on clearance about a year ago for $3...I loved the skirt but decided to go ahead and part with it since it was going toward a worthy cause.

So I began cutting and sewing and piecing together...

...and here is what I came up with...


I cut the bottom off of the skirt and attached it to the bottom of the dress. Then added some trim to the top of the pockets. I replaced the plain yellow ties at the top with fabric from the skirt. Finally I cut out the bust and two side panels and replaced them with skirt fabric. I made the two side panels a little large so that it widened the top of the dress...too tight top...problem solved!

I was really excited that she was going to be visiting me (along with our 3 other sisters) for mother's day so I would be able to give her the dress in person.
And to my delight it fit her perfectly!!! Yeah!!!

Happy 21st Birthday Erica!!! I love you so much and am so extremely proud of you and excited about what God has in store for your future!


Tuesday, April 13, 2010

Daddy Had To Have One Too...

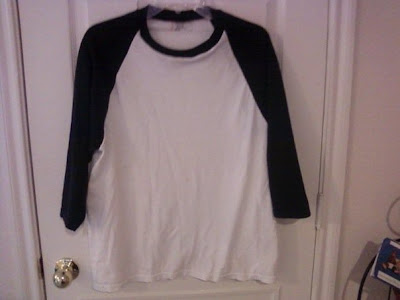
When my hubby came home the other day for lunch (the day of his first softball game) I showed him Jack's new classic baseball t-shirt he quickly announced..."I want one!"

Now, I have never made a shirt for my hubby before. Usually because I am taking his shirts and making them into things for the little man. But also because my hubby is growing out of his clothes so it is hard to take something that is too small on him and make it bigger to fit him.

But, I knew he wanted one...and I really wanted to see if I could even make one. So I went digging through his side of the closet once again.

...and I came out with a white t-shirt that currently fits him, and an old baseball style t-shirt from college that no longer does.

I took out my handy dandy scissors and got to cutting up that old shirt to make a pattern...

Thirty minutes later....and...


TADA! Chad's new...fits him perfect...classic baseball t-shirt! With 3/4 length sleeves :-)

It was surprisingly easy, easy, easy to make!

Here is how ya do it...

Grab...

1 White t-shirt that currently fits your man
1 old...no longer fits...baseball style shirt to use as a pattern
(possibly one more t-shirt...color of your choosing...see directions below)

Next...

Cut up your pattern shirt at the seams. You will have a front, back, two sleeves and a neck.

You can make a pattern from the shirt or use the shirt as your pattern like I did.

...lay the front part of your pattern shirt on the front of your white t-shirt like so...


Take a pen and trace around the top edges of the pattern. Next cut out the top of the shirt. You are going to want to leave the sides in tact other wise you are going to be creating unnecessary steps and actually shrinking the shirt.

Repeat this step for the back of the shirt...


and cut out. You should now have a front, back, and left over sides/sleeves and neck.

For the sleeves...

The baseball t-shirt that I had cut up for my pattern did not fit my hubby any more...in his tummy. But the sleeves still fit perfectly! So I cut them down the seams and made a pattern from them so I can use it again in the future.

Then sewed back up the seams and attached those sleeves directly to the white t-shirt. No additional t-shirt required :-)

Now if the sleeves on your hubby's shirt doesn't fit him either then you are going to need one more shirt in whatever color you want, that you can cut out sleeves from. Just line up the bottom of your pattern with the bottom of the t-shirt so you don't have to hem the edge of the sleeves.

Next attach the sleeves and neck line the same was as in Jack's classic baseball t-shirt...

and you are DONE!

So much easier than I had expected it to be! Now it is time to make one for me!

Take Me Out To The Ball Game! ...A Tutorial

It feels like it has been FOREVER since I have been able to get on here! Sadly our home computer has a virus that won't allow us to access the internet. :-(

So for now I have to wait till hubby comes home and brings his laptop to get ANY computer time.

So in the mean time I have been...thrift store shopping with my mom who came in to town this past weekend, giving my kitchen chairs and table a little face lift, and working on a couple of projects.

The first of those projects that I will share with you today is how to make your own classic baseball t-shirt.

The need for such a shirt for my little man, arose when I found out that his daddy was going to be playing on the church softball team. I wanted him to look the part and show his support for his daddy :-)

I am sure there is a tutorial already out there some where on how to make this style shirt but I haven't stumbled across it yet. So if you haven't found one either yet, I would be happy to share with you how to make your own for your little guy...

Okay first off, what you will need...

2 T-shirts (1 white, and 1 any color of your choosing.)
1 "Pattern Shirt" (this is a shirt that has the baseball style sleeves that you don't mind cutting up)
Paper
Pen
Scissors
Sewing Maching...of course ;-)

First off for my 2 T-shirts I choose and old white one and red one from my hubby's closet...


Next grab your baseball style t-shirt that you are going to cut up...this shirt has the baseball style sleeves but wasn't quite the look I was going for...


Cut it apart at the seams...you should now have five pieces...
1. front 2. back 3-4. sleeves 5. neck line

Next...take your front and back body pieces. Fold each in half and lay on your paper. Time to make your pattern :-)


You are going to want to do this with the front, back, and sleeves. (you can also do this with the neck line)


*Seam Allowances* You can either do this step in your pattern or when cutting out your fabric...but definitely don't forget it.
(In case your new to sewing...when cutting out fabric you will want to leave a seam allowance... or about 5/8 - 1" extra space around your pattern to "allow for seams" this way your shirt doesn't end up just a little too snug)

Next...cut our your patterns. Take your white t-shirt and front and back pattern pieces. If you look closely you can see that I labeled my patterns 'cut on fold'. Make sure you do that other wise you are going to end up with only half a back and half a front.

I also line up my pattern with the bottom of the shirt so I don't have to hem the shirt. This little step saves me so much time! (I hate to hem!)


Repeat the step above with the sleeve patter and the red (or whatever color you choose) t-shirt.
I also leave the t-shirt doubled so I can cut 2 out at once, as well as lining the pattern up with the bottom of the shirt so I don't have to hem the sleeves.


You can do the neck line one of two ways...either take the neck line from your pattern shirt and cut out the same size from your t-shirt(like the pic below)...or like I finally decided to do...simply cut off the neck from the red shirt to use as the actual neck. I prefer using the neck from the red shirt...I just like it ended up looking more put together in the end.


Okay now that you have your five pieces to the shirt cut out it is time to sew it together.

Pin your white t-shirt front and back pieces *right sides* together (once again...in case you are new to sewing...the right side of fabric would be considered the outside of this t-shirt. The wrong side of fabric would be considered the inside of this t-shirt)


Next sew your sides together.


Once you have that done set the body of the shirt aside briefly and pin together the bottom edges of your sleeves like so...once again *right sides* together...and sew this part together (but only this one side!) Make sure to leave the other sides open.


Now this part is a little tricky to explain but not at all difficult to do...

you are going to grab your t-shirt body and turn it *inside* out. Next take one of your sleeves and turn in *right side* out.

Next place the sleeve inside the body of the t-shirt and line up sides of the t-shirt arm holes with the sides of the sleeve. The bottoms near the arm pit should line up as well as the tops.

Okay that was probably confusing the way I explained it...hopefully this pic helps make some sense of that...


Now I am pretty bad at lining up my sleeves just right so I always put a running stitch (a very loose stitch) in it first because I usually end up using my seam ripper about two or three times before I get it just right.

And this time was no exception....after sewing it on I realized that the shoulder part of the sleeves was too long...so I had to take it apart... and trim it excessively.

Once I did that I tried it again...


...and finally success! So don't feel bad if it doesn't turn out just right the first 2,3,4,5 or however many times it takes to get it right!

Once the sleeves look right you are going to sew over your running stitch with a tighter stitch to secure them.

Now...for the neck. At first I had cut out a strip of fabric and sewed it on top of the shirt alot like the way Dana does for her 90 min. Shirt...but decided it just didn't quite work for this type of shirt.

So I decided to cut the existing neck off of the red shirt that I had used for the sleeves. And measured and cut it to fit Jack's shirt.

To sew the neck onto the shirt you are going to want to turn your neck upside down and pin it to the t-shirt...*right sides* together.

Like so....


Maybe this pic will help it make more sense...


To attach the two sew closely to the top of the shirt like the picture above shows. Then remove your pins and flip the neck line back up.

If you are unsure by my directions on this step grab a t-shirt in your house and examine the way the neck is attached to the t-shirt...hopefully that will help :-) If not feel free to ask me and I will try my best to explain it a little better.

And that is it! You are done!


Put it on your little man and enjoy :-)


What is this mommy?


hhhhmmmm...I bet this would taste pretty good...


How to get it in my mouth though...


I think I've got it....


AAAAHHHH! SUCCESS! IT TASTE SO GOOD!

I also plan on adding his last name and a number to the back of his shirt....I think I am going to buy some nice iron-on letters to complete this look.

Hope you have fun trying your own classic style baseball t...happy sewing!


p.s. Feel free to ask me any questions and let me know if any of the directions were confusing or unclear :-)

Wednesday, March 31, 2010

An Easter Suit For The Little Man

Last on my list of things to make before Easter...a new outfit for Jack for Easter Sunday.

I have noticed lately that you can find a TON of cute Easter outfits for little girls...but it seems like the little men of this world have been forgotten. The selection for little boy clothes always seems to be pretty minimal.

So, I decided to go ahead and make little man an outfit myself. This is my second attempt at making this suit for Jack...you can see my first attempt here...and I am so pleased with the way it turned out!


The vest and pants are made out of a pair of my hubby's dress pants that he can no longer fit into.

The vest is lined with black satin from an old robe of mine that I never used.

I just love re-purposing...don't you!!!


His entire Easter outfit cost me a total of $0!
Let's see...
Fabric for Vest and Pants- Daddy's old dress pants
Fabric to line Vest- never been used robe
Buttons for Vest- Salvaged off of Daddy's dress pants
Elastic for Waistband of Pants- already had on hand from a while ago
White button up shirt - given to us by a wonderful mommy in our church
Hat- bought at a thrift store by Jack's Hunny (Grandma)

The only thing I really need to finish off this look is a pair of dress shoes; and a tie or bow tie (which I plan to make out of fabric I already have on hand).

All in all a pretty amazing deal for an Easter outfit!

And doesn't he look handsome!


Tuesday, March 23, 2010

Editing My Spring Wardrobe...

I have been having so much fun thinking of new ways to refashion the clothes I currently have in my wardrobe.

Today I am going to share my latest, and favorite shirt refashion.

Here is what I originally had to work with...


This is a sweater I bought about a year back at Target. I really loved it...then. But looking at the way it fits now...it is just slightly too tight and the bottom hits at just exactly at the wrong spot... a spot no one would want to emphasize. But I still loved the color and the top fit just perfect.

So I took out my scissors and machine and got to work.

...and here is what I ended up with...


I decided to make a shrug :-) To begin I cut off the ribbed bottom folded it in half and sewed it back on to the shortened shirt. This helped keep the bottom from being too loose and gives it a little more stretch.

The buttons on the front actually came from the side of the shirt...a weird place to have buttons. So I just cut off the fabric strip and sewed it on the front. This saved me a ton of time since I didn't have to sew new button holes! (...and I abhor sewing button holes!!!!)

Next I shorted the sleeves and re-attached the ribbed bottom portion to the sleeve so that it gave it a little puff.

At this point I was starting to feel much better about the shirt, but it still didn't feel finished. So I attached four doilies to the top to give it a little more visual interest. (I got a full bag of these fabulous babies in one of the three boxes of fabric my mom gave me the last time I visited her!)
I simply pinned them on where I wanted them and stitched them on with my machine.

I am so pleased with how it turned out!

Saturday, March 20, 2010

"New" Dress For Lil Sis

This past weekend my hubby, son, and I got to visit my family in Texas...

I always LOVE spending time with my parents and FOUR sisters! -yes a family of five girls....no boys except for dad...needless to say that when I had my son I had no clue what in the world I was supposed to do with a boy! I am quickly learning though ;-)


From Top: Andrea, Miranda, Erica, Me, and Lil Sis (Emma)

My mom is extremely crafty and artistic...it is where I would like to think that I got my creativity from. The last few times I have seen her she has purged her fabric supply and graciously donated it to me! So WONDERFUL! This time was no different...I got three full boxes of fabric, lace, and doilies!! My mind has been going ninety to nothing thinking about everything I want to do with it all!

So while there and going through all the fabric...my mom started talking to me about fixing a few of my little sisters clothes that were becoming too short or had holes in them. She showed me a simple blue dress that had an unfortunate hole at the top near the neck, and asked what we should do to fix it.

I immediately began digging through the boxes to find something to hide the hole and make the dress a little more than just a simple blue dress...

I ended up finding some pretty lacy ribbon...

and here is what I came up with...
STRIKE A POSE :-)
Lil Sis showing off her "new" dress for me. Don't you just love those glasses and big eyes!!!

For the ruffle on top I simply put a running stitch in the top and the bottom of the lace and pulled the thread so that it gathered. Then I pinned the lace to the top of the dress and stitched over the running stitch at the top and bottom.

...and that was it...easy peasy. The hole is fixed...and Lil Sis looks so pretty!!!

Friday, March 5, 2010

Baby Food Jars & Formula Cans

As you all know I love re-purposing! Since Jack has started eating baby food, I now have a ton of baby food jars every where. It really bothered me to throw them away at first, so I finally decided to start washing them out and saving them until I could find a new purpose for them.

So now that my shelf is over flowing with baby food jars, (Jack is a hungry little hippo after all!) I finally got the motivation to figure out what to do with them!

I grabbed a few jars and my handy dandy glue gun and got to work....and the picture to the left is what I ended up with...tea light candle stick holders!

I simply took off the lids and hot glued the jars end to end. You could definitely see the hot glue -it was not so pretty- so I hot glued some green ribbon on to hide the ugliness put a tea light in the top...and called it good :-)
I was even thinking if you didn't like the glass look of it (which I love right now) you could always spray paint them...not sure how it would work out...I have never tried to spray paint glass before...just a thought.

I have a bunch of lids left over from the jars I used for the candle sticks...so I am going to make them into a memory matching game for when Jack gets a little older. (more on this idea at a later date)

Now most of my crafting supplies have been stored in ziploc baggies...my bobbins, buttons, needles, etc. Not the cutest way to store and organize my supplies but it worked for a time.

I finally decided that the baggie thing was becoming a little annoying and that I would really like to be able to look at my craft shelf and just see what I needed, instead of having to sift through baggies to find the right one.

So here was my solution to that little problem...


I am now using the baby food jars to store most of my craft/sewing supplies. I also decided to save a couple of the formula cans to use as pencil and scissor holders. For the formula cans I simply took the label off and modge podged whatever paper I liked best to the outside to make it prettier :-)

This project has really got me thinking...
What else can I do with baby food jars???


So I got online and found quite a few awesome ideas...so here are some of
the creative things you can do to re-purpose your baby food jars...

-A few places I found the ideas below...here.... and here
  • Great for storing buttons, nails, screws or beads.
  • Fill halfway with water with a few drops of food colouring, fill the rest of the way with baby oil and add a few sparkles if you want. This amazes kids!
  • Punch holes in the top. Instant house for a bug or other critter! Kids can look at them and learn, without hurting their new friends.
  • Punch holes in the top and fill with cornstarch or powder for baby’s bum.
  • Good for holding finger paints and glues!
  • Paint the lid or cross stitch a cover with the words “first tooth” or “first haircut” on it. Makes a great keep sake.
  • Paint for the holidays! You can make a Santa, Jack-o’-lantern or Easter basket!
  • Use for starting seedlings indoors.
  • Make into a musical instrument. Just put some coins, rice or beans in them. Glue the lid on!
  • Make into a pin cushion...cute idea found here
  • Use them to store home made play dough
  • Here is where you can find some great ideas to re-purpose formula cans...such as jack-o-lanterns, play house, and holiday storage.
It seems like you can do just about anything with these jars! So get to thinking and creating and never throw away another baby food jar again!!!

Saturday, February 27, 2010

More Re-purposing Fun!


Once again I have been inspired by the art of re-purposing! There are so many great ideas and endless options for those who want to re-purpose.

Jack Jack is sporting a new shirt thanks to some great inspiration I got from this momma. It has been Celebrate the Boy month over there and I have been LOVING it! It is so hard to find really cute stuff to make for my little man and she has tons of ideas. So using her oh so easy tutorial on the envelope shirt I whipped up three new, adorable shirts for my Jack Jack.

As I have said before my hubby has put on a couple extra pounds (it is a good thing! he NEEDS the extra padding!). Therefore, I have tons of extra t-shirts, jeans, and pants to breathe new life into. I grabbed three t-shirts from that stash- a black and gray baseball style shirt, a plain red one, and a plain green one.

Next I found an old onesie that still fit Jack but had an ugly painted owl on the front of it (one of those trial and error kind of projects!) so he wasn't going to wear it ever again. I cut it up and used it as my pattern for the shirts. I had to adjust my pattern several times so each of the three shirts fits a little different, but overall each fits pretty well. I am still working on getting the pattern just right- it needs just a couple more tweaks and it will be perfect :-)

I loved using Chad's old t-shirts for this project! Mainly because I lined the bottom of my pattern up with the bottom of the t-shirt and cut the sleeves out of the existing sleeves. By doing this I did not have to hem anything! Wonderful!

Since the t-shirts we're very plain I decided to applique some cute little things to the front, a tractor, a fire truck, and an airplane. I found the patterns for the designs at this website...and guess what...they are free! (I love that word!) You can print the stencils off...or like me you can just cut out the shapes free hand. Next I used some heat-n-bond to attach them to the t-shirt and sewed around the edges to make sure they didn't come off in the wash.

I do have to say I was pretty intimidated by this project! It took me a lot to work up the courage to try it...but surprisingly it was...easy. Now easy doesn't mean that I didn't have to re-attach the sleeves about a dozen times (to make matters worse I lost my seam ripper right before this project!) and re-do the pattern a couple more times just to get the fit right, or that it came out perfect; what easy does mean is that I finished it!!! Completion not perfection my friends, that is the key to a sane sewing experience :-)

Friday, February 26, 2010

Jack's New Outfit


So I have seen a ton of posts lately on re-purposing old clothes and objects into something new. I LOVE the idea! Well this is one of my first (and favorite) attempts at re-purposing.


Since I got pregnant with Jack my hubby has also been gaining weight :-) He has gone up at least one if not two sizes in just about everything. So....I now have a ton of t-shirts, jeans, dress pants, etc to re-fashion into something for my littlest man!


So as I was digging through hubby's clothes I found a pair of dress pants...I have been wanting to make Jack a nice outfit for church and he has been growing so fast that I didn't want to buy a new outfit when he probably will only get to wear it one or two times! (I'm sure most mom's out there can relate to this problem!)

I grabbed up the pants and went to my kitchen table(i.e. my "craft room"...wish I actually had one!) Then I found a pair of pants that currently fit my growing little man and a vest I found at the thrift store. Next I made patterns. There are tons of post out there on how to make patterns for pants...if you Google it I promise you will find it :-) (not really sure how to post the links on here yet, it is on my list to figure out!). The pants were the easiest part of this outfit I just lined up the pattern with the bottom of my hubby's pants so I didn't even have to hem the bottom! The waist band is just an elastic waist band -much easier to put on baby that way! I also cut the belt loops off my hubby's pants and attached them to Jack's.


Since I cut the pants out of the bottom of hubby's pants I had the whole top part left over...so I used that part to make the vest. These particular dress pants were lined, so I used that lining to line the vest. The vest is made up of three parts: the back, front left side, and the front right side. I think next time I need to make the vest pattern a little bigger since I sewed the outside and lining right sides together, then turned it right side out, then sewed the seams together (it fits pretty snugly right now!) Definitely need to make those adjustments...but altogether not too bad for a first try!


I am planning on making another outfit for Jack for Easter out of a pair of gray stripped dress pants...maybe I will try and do a step by step "tutorial" to post on here when I tackle that one. Now all I need to do is figure out how to make that bow tie he is wearing! (which is actually his daddy's...that would be the reason it is so big on him...but it was just to cute to resist!)
Related Posts Plugin for WordPress, Blogger...